Each second tens of thousands of bots scan all available IPs trying to find any open hole in your system and use it for their shady things like malware, and spyware, infecting your machine with botnets, spam scripts, and other harmful type of infection to their favor. Below I will share the things you need to do with your “nude” server to get the Basic Protection of Your Fresh Server (VPS, Dedicated)
There are some basic protection things for your fresh server (VPS or Dedicated one) I suggest you apply when you open your server to the public internet.
- Enable SSH Connection only with SSH Keys
- Change your SSH Port
- Disable root login if you do not need it
- Disable password connection (connect only with SSH keys)
- Make sure your system is up-to-date
How to enable SSH Connection with SSH Keys only#
First, you need to create your own SSH keys
Generate SSH Keys#
For Windows Users#
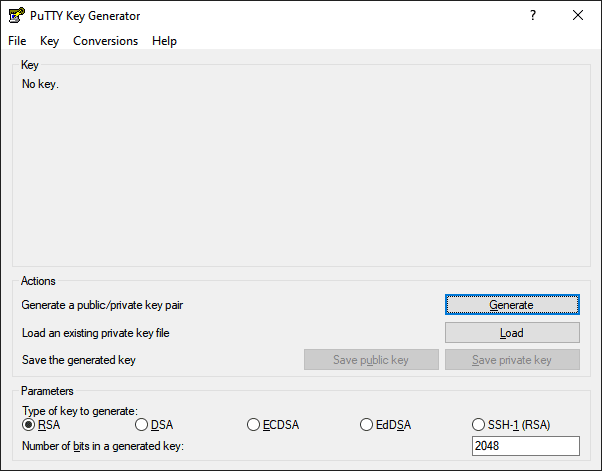
PuTTY Key Generator – Download and install the latest from https://www.puttygen.com
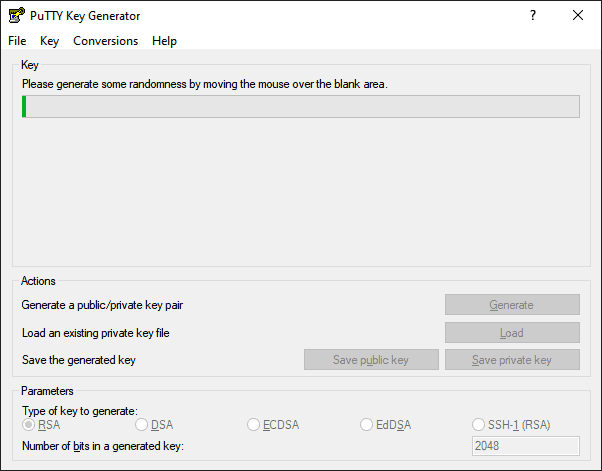
Click the “Generate” Button and start moving your cursor around to generate a new SSH key
Now, you have your own, unique SSH key generated. I suggest you add a “Key passphrase” and “Confirm passphrase“. This is the password your will need to enter when you establish an SSH connection to your server. It can be short.
Save your public and private keys under the “Actions” section.

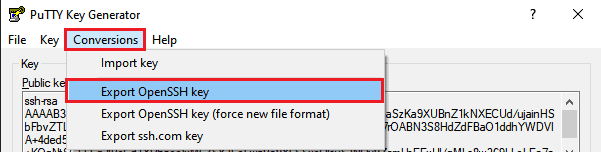
Save the “OpenSSH” key version from “Conversions > Export OpenSSH Key” into your “C:\Users**<your_user_name>**.ssh” folder – you will need this key for connection from “Windows Terminal”
If you would like to add your key during the new VPS setup with cloud services, you will need to copy it directly from the “Key” section and paste it into the “SSH Keys” section during the new VPS setup process.

Now you need to add your Public key to your “authorized_keys” file on your remote server
Connect to your server with Windows Terminal (If you are on Windows 10 or Windows 11)
Connect to the server#
Replace 123.123.123.123 with your server IP and run:
You should see output similar to this:
Welcome to Ubuntu 22.04 LTS
Last login: Mon Feb 5 10:42:11 2026
If this is your first connection to your server, you will need to add fingerprints by typing “yes“
The authenticity of host '123.123.123.123 (123.123.123.123)' can't be established.
ECDSA key fingerprint is fc:fr:c7:g7:54:re:89:76:r2:65:10:dd:d6:3d:41:87.
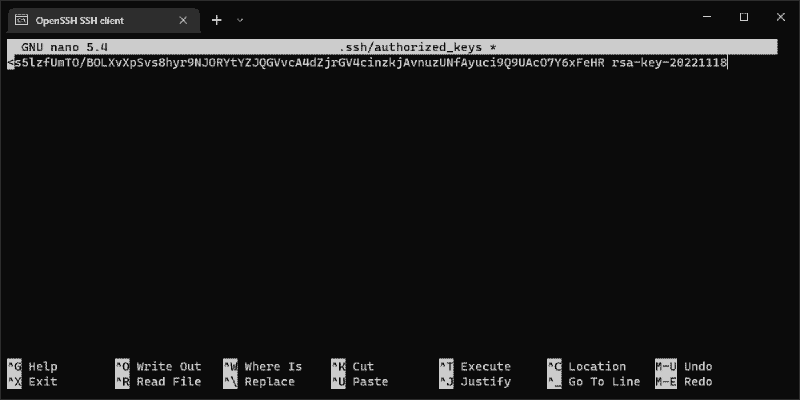
Are you sure you want to continue connecting (yes/no)? yesNow open “.ssh/authorized_keys” with the nano editor
nano .ssh/autorized_keys*Note: you need to run this with root account, or use “sudo nano root/.ssh/authorized_keys” with your sudo preveledged account
Copy your Public key from the “PuTTY Key Generator” Key field into the “authorized_keys” by copying it with “CTRL+C” and pasting it with the right Mouse button click when your “Windows Terminal” is focused (just click inside the typing area)
Open your “Windows Terminal“
Replace the placeholders with your actual values:
<your_user_name>— your Windows PC username<your_openssh_key_name>— the name of your exported OpenSSH key
Run the following command:
ssh [email protected] -i "C:\Users\<your_user_name>\.ssh\<your_openssh_key_name>"If you configured a passphrase during SSH key generation, you should see a prompt like this:
Enter passphraseGreat, now you have verified your SSH key and connection to your remote machine.
Step 1: Change your SSH Default port 22#
Connect to your remote SSH server and type:
sudo nano /etc/ssh/sshd_configUncomment line and change port to any you prefer, I suggest you to pick 4 or 5 digits port#Port 22Port 22345
Hit
CTRL+X - to exit Nano Editor
Y - to save changes
Enter - to save under the same name
Great, now your port is changed from 22 to 22345, but you need to restart the ssh service.
Type:
systemctl restart sshVerify your ssh.service is active and runing and you see your new port
Type:
systemctl status sshYou should see the output something like this:
Nov 18 06:24:31 debian systemd[1]: Starting OpenBSD Secure Shell server...
Nov 18 06:24:31 debian sshd[1755]: Server listening on 0.0.0.0 port 22345.
Nov 18 06:24:31 debian sshd[1755]: Server listening on :: port 22345.
Nov 18 06:24:31 debian systemd[1]: Started OpenBSD Secure Shell server.
Now to connect to your server you need to specify port
Do not forget to replace the placeholders with your actual values:
<your_user_name>— your Windows PC username<your_openssh_key_name>— the name of your exported OpenSSH key Type:
ssh [email protected] -i "C:\Users\<your_user_name>\.ssh\<your_openssh_key_name>" -p 22345Step 2: Disable root login if you do not need it#
Make sure you have created a new user to connect to the server before you disable the root login!
New User with sudo privileges#
usernameis your username (in my case it’s jk)
Input#
adduser usernameOutput#
root@debian:~# adduser jk

Adding user `jk' ...
Adding new group `jk' (1000) ...
Adding new user `jk' (1000) with group `jk' ...
Creating home directory `/home/jk' ...
Copying files from `/etc/skel' ...
New password:
Retype new password:
passwd: password updated successfully
Changing the user information for jk
Enter the new value, or press ENTER for the default
        Full Name []:
        Room Number []:
        Work Phone []:
        Home Phone []:
        Other []:
Is the information correct? [Y/n] Y
Add new user to sudo group (to get the superuser do previleges)#
jkis my username
Input#
usermod -aG sudo jkVerification#
getent group sudoOutput#
sudo:x:27:jkNow you can try to log in with your new user and verify that you have permission to use sudo#
jkis your username
Input#
su jk
cd ~
sudo ls -laOutput#
total 20
drwxr-xr-x 2 jk   jk   4096 Nov 18 07:27 .
drwxr-xr-x 3 root root 4096 Nov 18 07:27 ..
-rw-r--r-- 1 jk   jk    220 Nov 18 07:27 .bash_logout
-rw-r--r-- 1 jk   jk   3526 Nov 18 07:27 .bashrc
-rw-r--r-- 1 jk   jk      0 Nov 18 07:27 .cloud-locale-test.skip
-rw-r--r-- 1 jk   jk    807 Nov 18 07:27 .profile
Step 3: Copy “authorized_keys” from the root to your user#
Great, now you need to copy the “authorized_keys” file from the root to your user home directory
jkis your username
Input#
First you need to create folder .ssh under your user home directory:
mkdir /home/jk/.sshMake sure only the new user has permissions:
chmod 700 /home/jk/.sshNow you need to copy your root authorized_keys to your .ssh folder:
sudo cp /root/.ssh/authorized_keys /home/jk/.ssh/authorized_keysChange the owner for ~/.ssh/ folder and “authorized_keys” file:
sudo chown -R jk:jk ~/.ssh/
sudo chown -R jk:jk ~/.ssh/authorized_keysVerification#
ls -la /home/jk/.sshOutput#
total 12
drwx------ 2 jk jk 4096 Nov 18 15:43 .
drwxr-xr-x 3 jk jk 4096 Nov 18 15:38 ..
-rw------- 1 jk jk  392 Nov 18 15:43 authorized_keys
Step 4: Disable root login via sshd_config#
Now you can disable root login or password login.
Input#
sudo nano /etc/ssh/sshd_configChange
PermitRootLoginno
To save your changes
Hit
CTRL+X, Y, ENTER
Step 5: Disable login with password#
Completely disable password logins
Input#
sudo nano /etc/ssh/sshd_configUncomment
PasswordAuthenticationno
To save your changes
Hit
CTRL+X, Y, ENTER
Good Job, now you have your SSH keys configured for root and a new user changed the default SSH port and disabled root login (or better password login).
The Basic Protection of Your Fresh Server (VPS, Dedicated) is now done.
You can now start building your project. 🎉
Are you interested in my quick guide on how to install Docker, docker-compose, and Portainer?